Spaghetti Friend.
A little spaghetti happiness, one piece at a time.
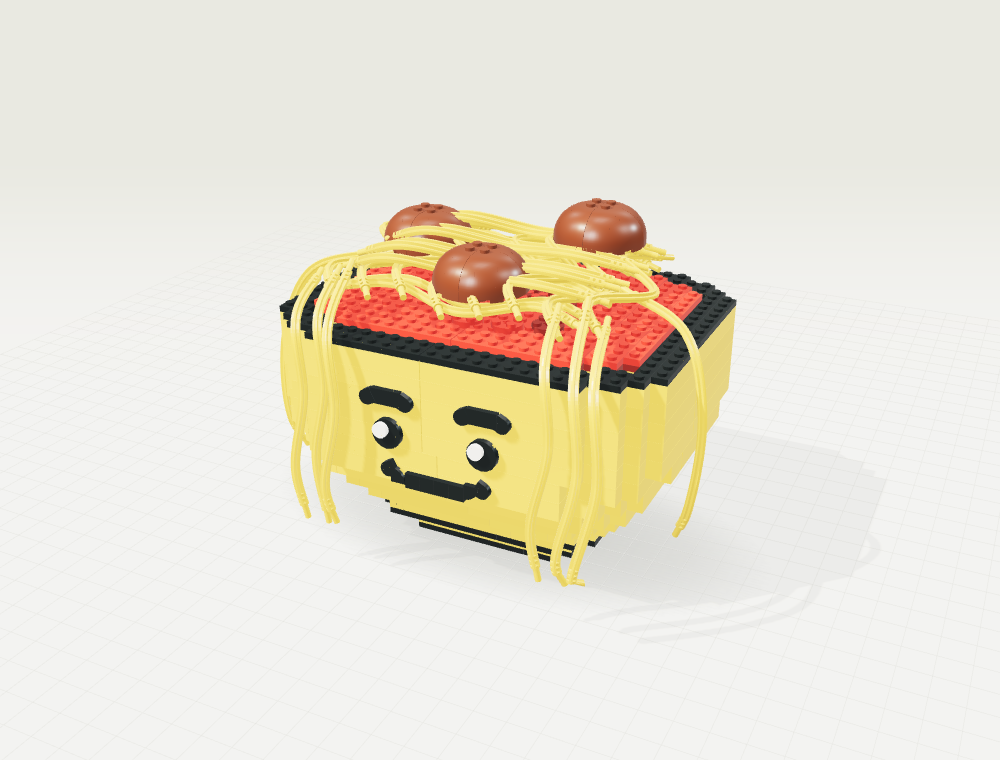
Follow the assembly in order. Each illustration shows the model so far: colored pieces are new, and gray pieces are already placed. Part numbers refer to the LDraw library.
Digital assembly concept based on socks.png. This is not a physically validated building kit. Facial attachments, internal supports, flexible-axle bends, and part/color availability need review before buying or building.
Jump to a step
- A sturdy little foot
- Build the yellow pedestal
- Outline the base
- Support the bowl
- Start the golden bowl
- Shape the bowl · layer 2
- Shape the bowl · layer 3
- Shape the bowl · layer 4
- Shape the bowl · layer 5
- Shape the bowl · layer 6
- Shape the bowl · layer 7
- Shape the bowl · layer 8
- Shape the bowl · layer 9
- Shape the bowl · layer 10
- Finish the upper wall
- Cap the rim
- Add the inner ledge
- Two bright eyes
- A spark of personality
- Raise those eyebrows
- Make room for a smile
- Prepare the topping tray
- Spoon on the red sauce
- A little extra sauce
- Three little meatballs
- The first forkful
- Twirl across the top
- One more happy tangle
- Let the noodles drape
- The last little noodle
A sturdy little foot
Lay the black foundation plates. The small pedestal gives the bowl its familiar silhouette.
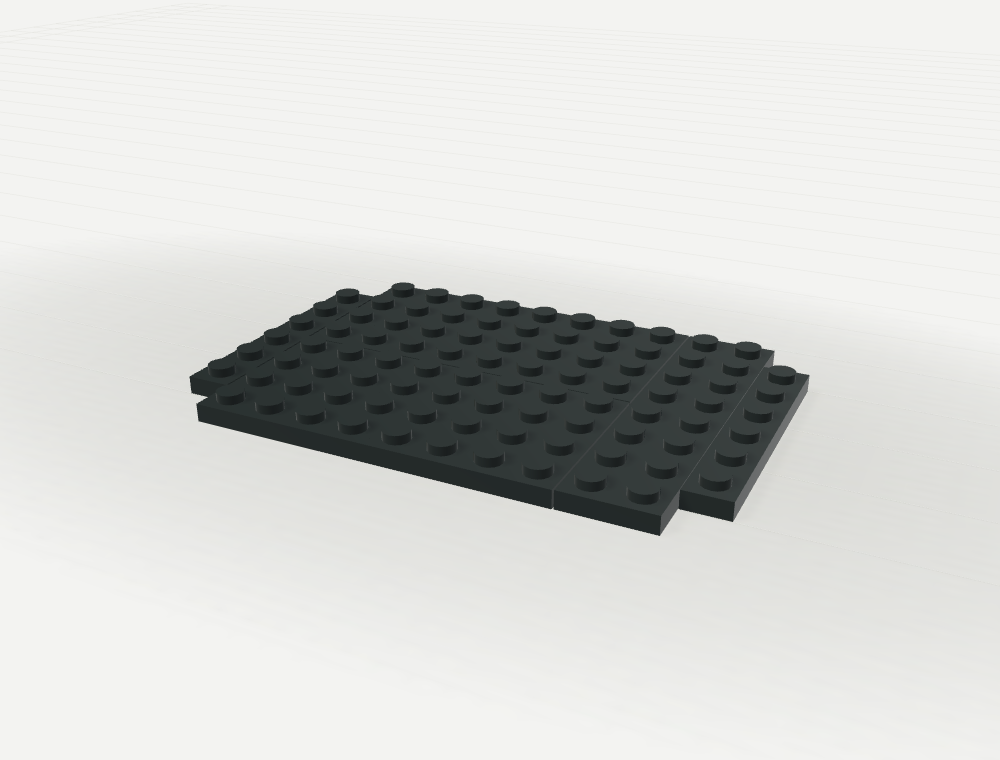
| Part | Description | Color | Qty |
|---|---|---|---|
| 3035 | Plate 4 x 8 | Black | 2 |
| 3666 | Plate 1 x 6 | Black | 2 |
| 3034 | Plate 2 x 8 | Black | 1 |
Build the yellow pedestal
Add the yellow band above the foot. Keep the top level for the wider bowl.
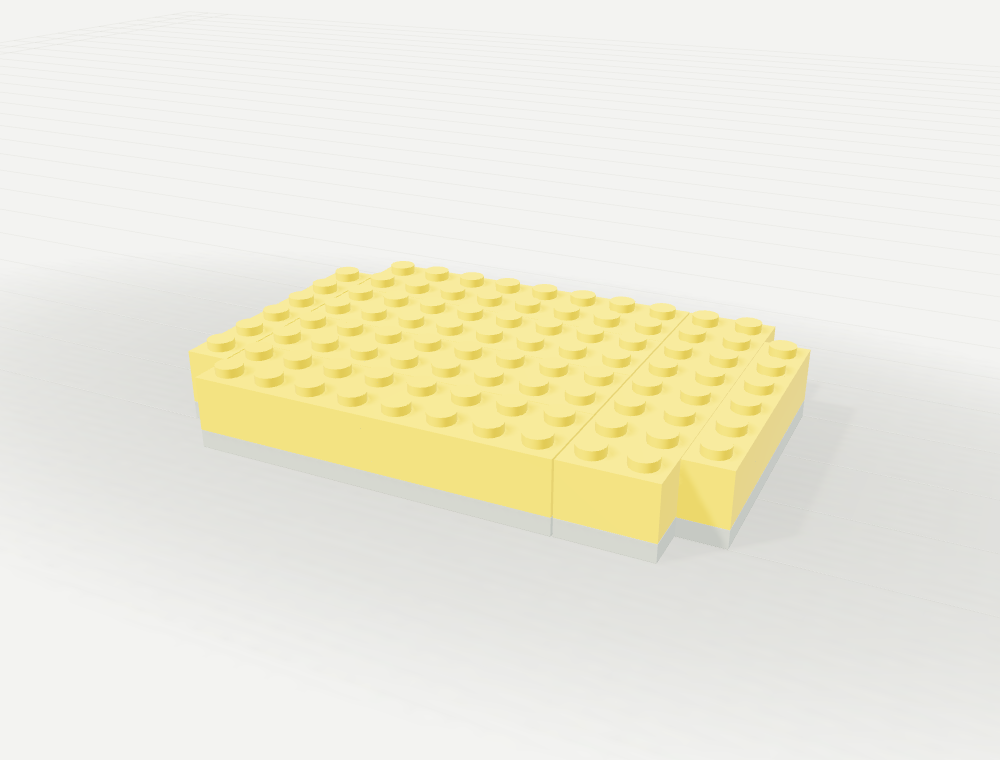
| Part | Description | Color | Qty |
|---|---|---|---|
| 3007 | Brick 2 x 8 | Yellow | 5 |
| 3009 | Brick 1 x 6 | Yellow | 2 |
Outline the base
Add a slightly wider black lip, echoing the bold outline in the reference image.
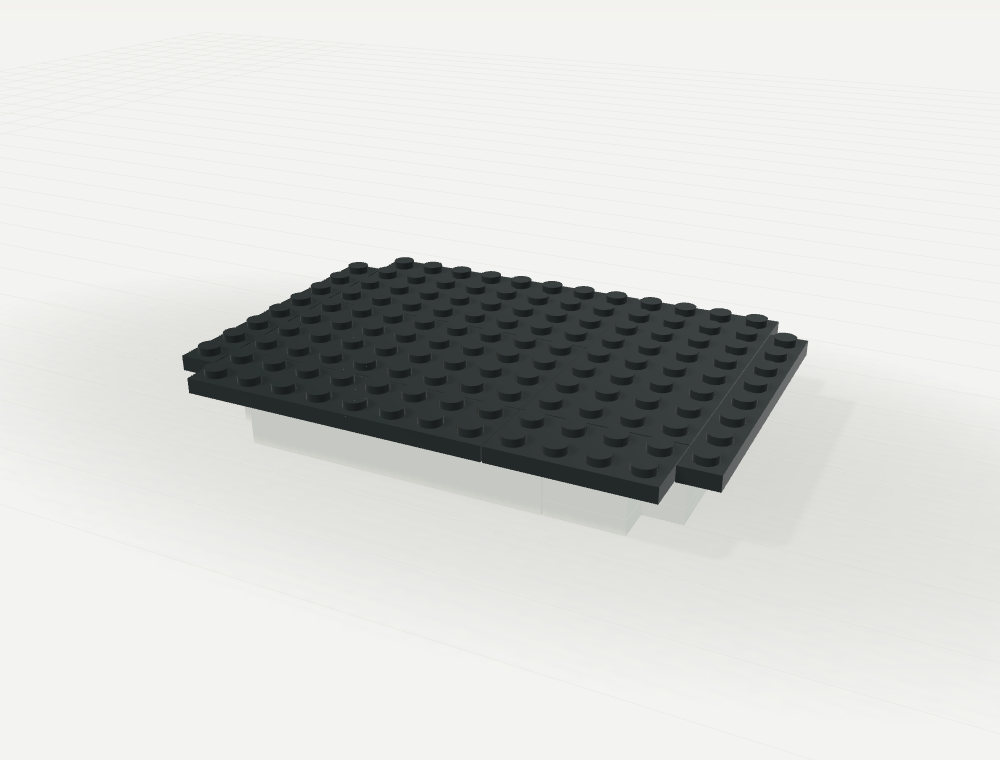
| Part | Description | Color | Qty |
|---|---|---|---|
| 3035 | Plate 4 x 8 | Black | 3 |
| 3460 | Plate 1 x 8 | Black | 2 |
| 3020 | Plate 2 x 4 | Black | 1 |
| 3034 | Plate 2 x 8 | Black | 1 |
Support the bowl
Bridge the pedestal with a wider foundation. The center stays solid beneath the hollow shell.
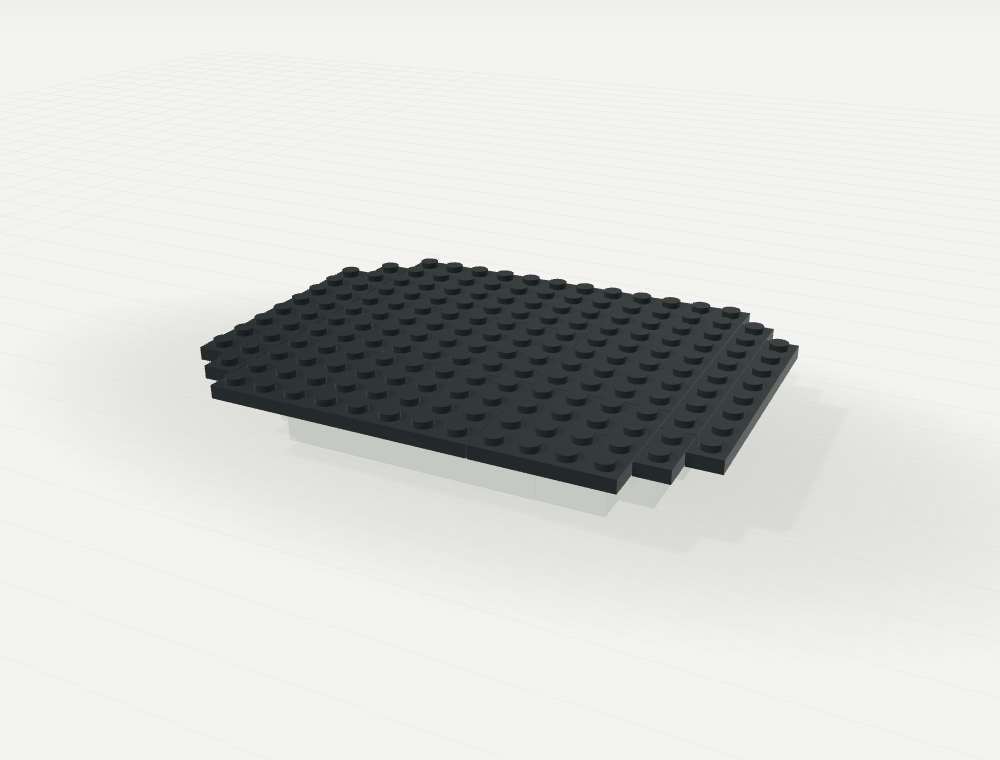
| Part | Description | Color | Qty |
|---|---|---|---|
| 3035 | Plate 4 x 8 | Black | 4 |
| 3460 | Plate 1 x 8 | Black | 4 |
| 3020 | Plate 2 x 4 | Black | 2 |
| 3023b | Plate 1 x 2 | Black | 2 |
Start the golden bowl
Step the yellow bricks outward to round the bottom of the bowl.
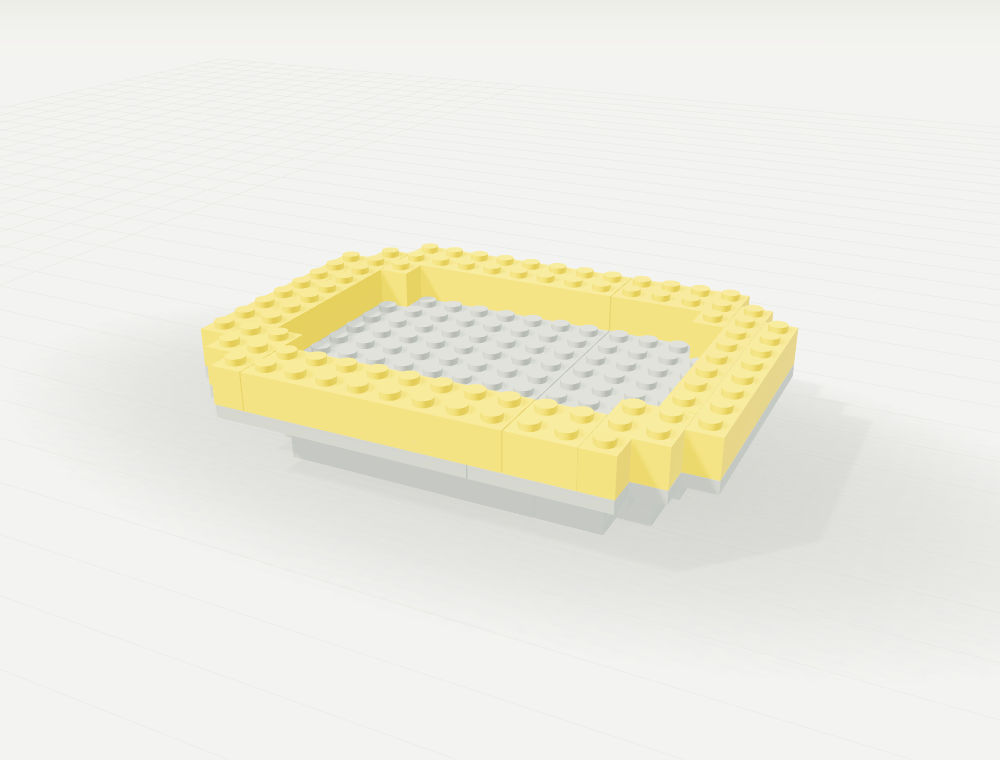
| Part | Description | Color | Qty |
|---|---|---|---|
| 3005 | Brick 1 x 1 | Yellow | 4 |
| 3008 | Brick 1 x 8 | Yellow | 4 |
| 3003 | Brick 2 x 2 | Yellow | 3 |
| 3007 | Brick 2 x 8 | Yellow | 2 |
| 3001 | Brick 2 x 4 | Yellow | 1 |
Shape the bowl · layer 2
Step the yellow bricks outward to round the bottom of the bowl.
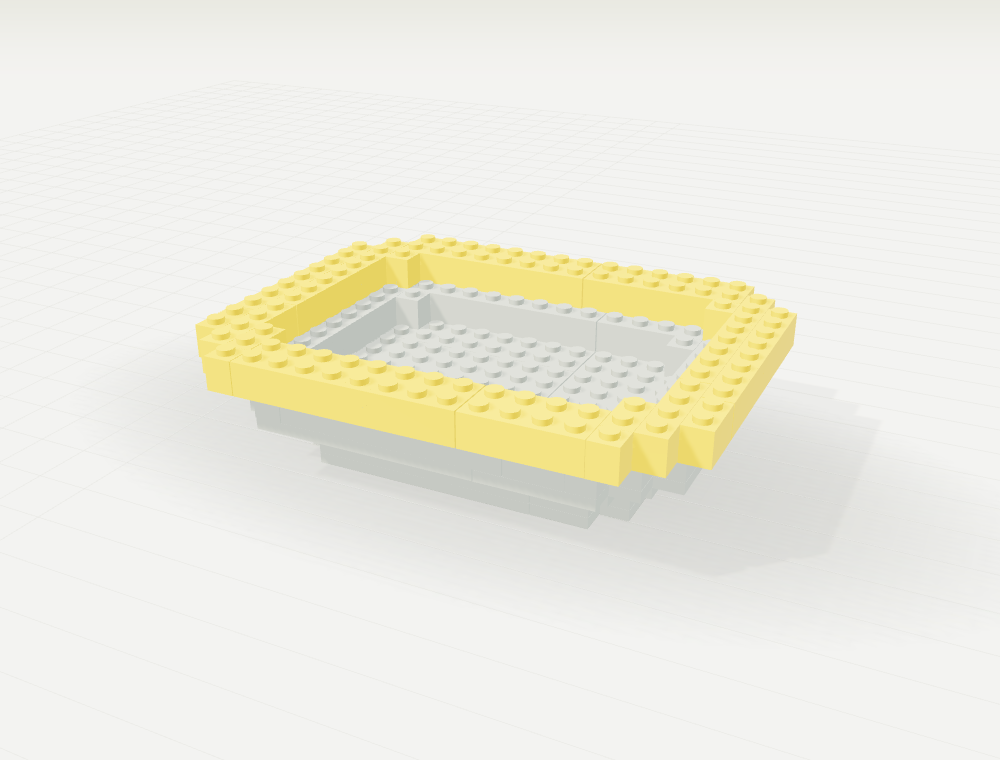
| Part | Description | Color | Qty |
|---|---|---|---|
| 3004 | Brick 1 x 2 | Yellow | 4 |
| 3005 | Brick 1 x 1 | Yellow | 4 |
| 3008 | Brick 1 x 8 | Yellow | 4 |
| 3007 | Brick 2 x 8 | Yellow | 2 |
| 3010 | Brick 1 x 4 | Yellow | 2 |
| 2456 | Brick 2 x 6 | Yellow | 1 |
| 3001 | Brick 2 x 4 | Yellow | 1 |
Shape the bowl · layer 3
Step the yellow bricks outward to round the bottom of the bowl.
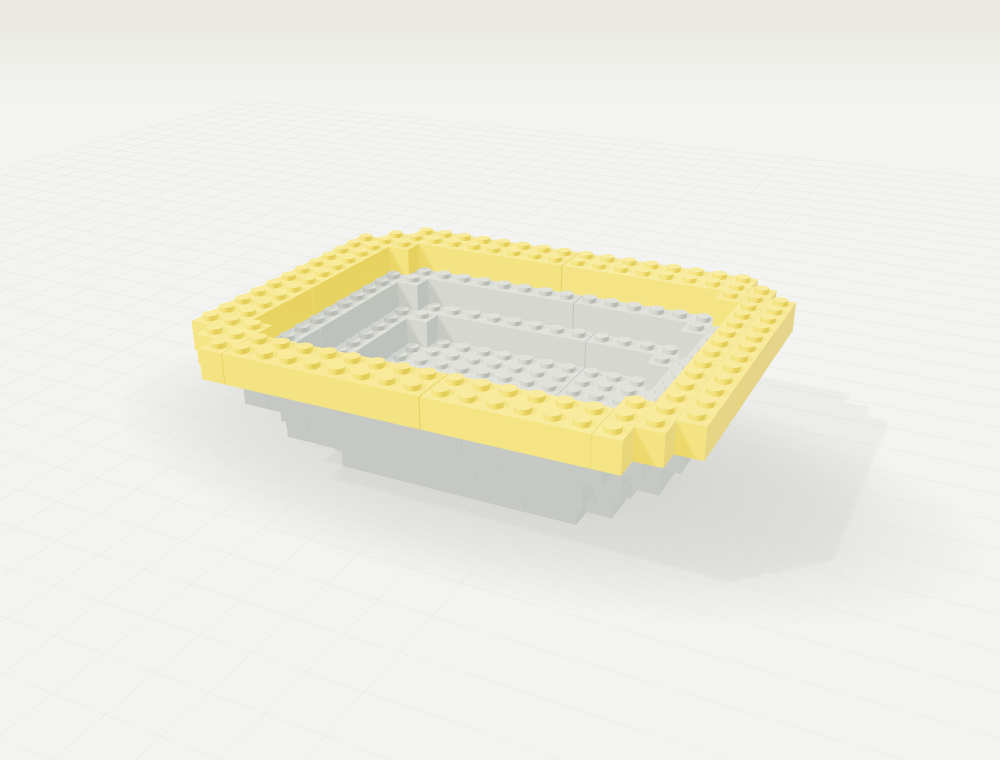
| Part | Description | Color | Qty |
|---|---|---|---|
| 3005 | Brick 1 x 1 | Yellow | 4 |
| 3008 | Brick 1 x 8 | Yellow | 4 |
| 3007 | Brick 2 x 8 | Yellow | 3 |
| 3004 | Brick 1 x 2 | Yellow | 2 |
| 3009 | Brick 1 x 6 | Yellow | 2 |
| 3010 | Brick 1 x 4 | Yellow | 2 |
| 2456 | Brick 2 x 6 | Yellow | 1 |
Shape the bowl · layer 4
Step the yellow bricks outward to round the bottom of the bowl.
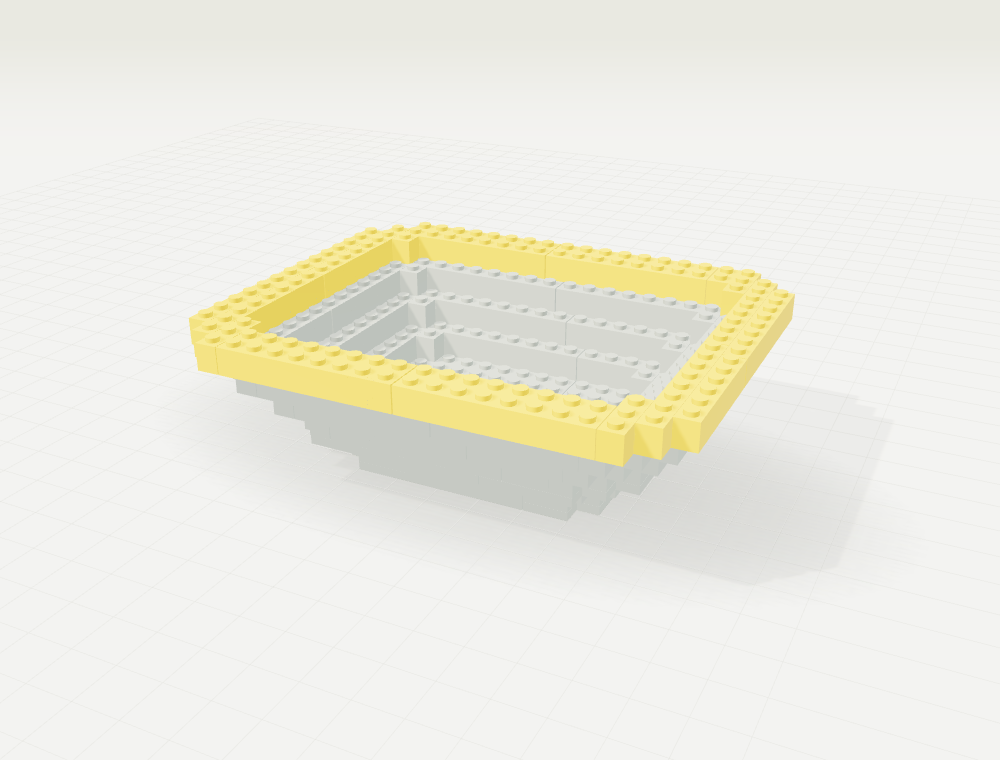
| Part | Description | Color | Qty |
|---|---|---|---|
| 3008 | Brick 1 x 8 | Yellow | 6 |
| 3005 | Brick 1 x 1 | Yellow | 4 |
| 3007 | Brick 2 x 8 | Yellow | 4 |
| 3004 | Brick 1 x 2 | Yellow | 2 |
| 3009 | Brick 1 x 6 | Yellow | 2 |
| 3003 | Brick 2 x 2 | Yellow | 1 |
Shape the bowl · layer 5
Continue the hollow shell, keeping the wide front face clear for the smile.
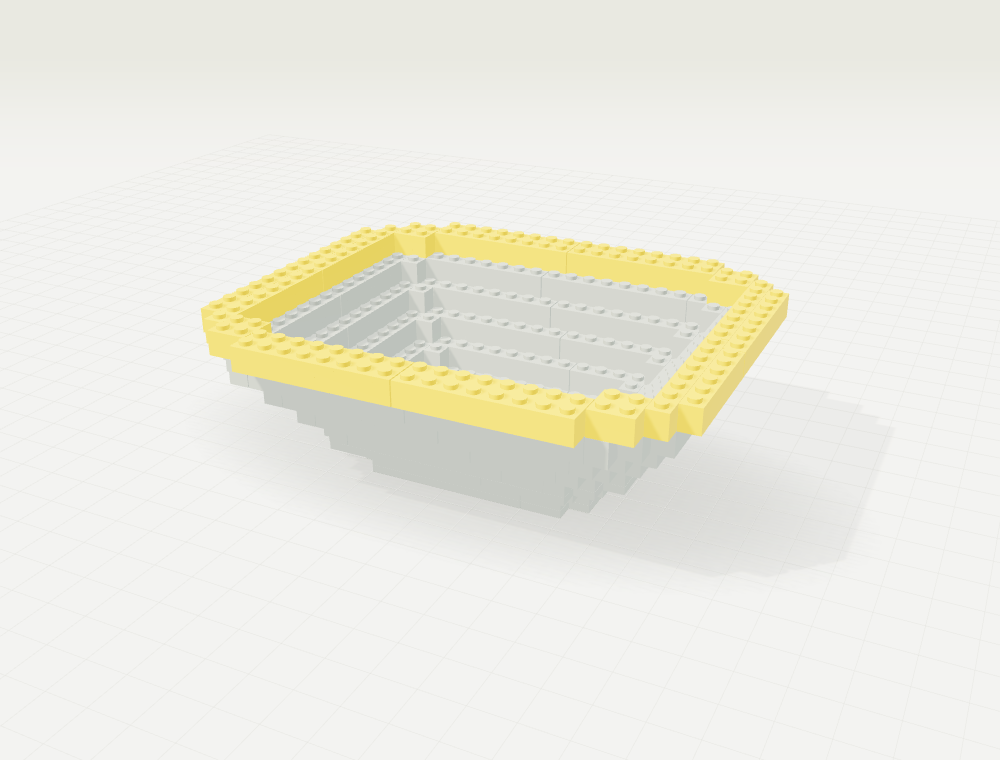
| Part | Description | Color | Qty |
|---|---|---|---|
| 3008 | Brick 1 x 8 | Yellow | 6 |
| 3003 | Brick 2 x 2 | Yellow | 4 |
| 3007 | Brick 2 x 8 | Yellow | 4 |
| 3009 | Brick 1 x 6 | Yellow | 2 |
Shape the bowl · layer 6
Continue the hollow shell, keeping the wide front face clear for the smile.
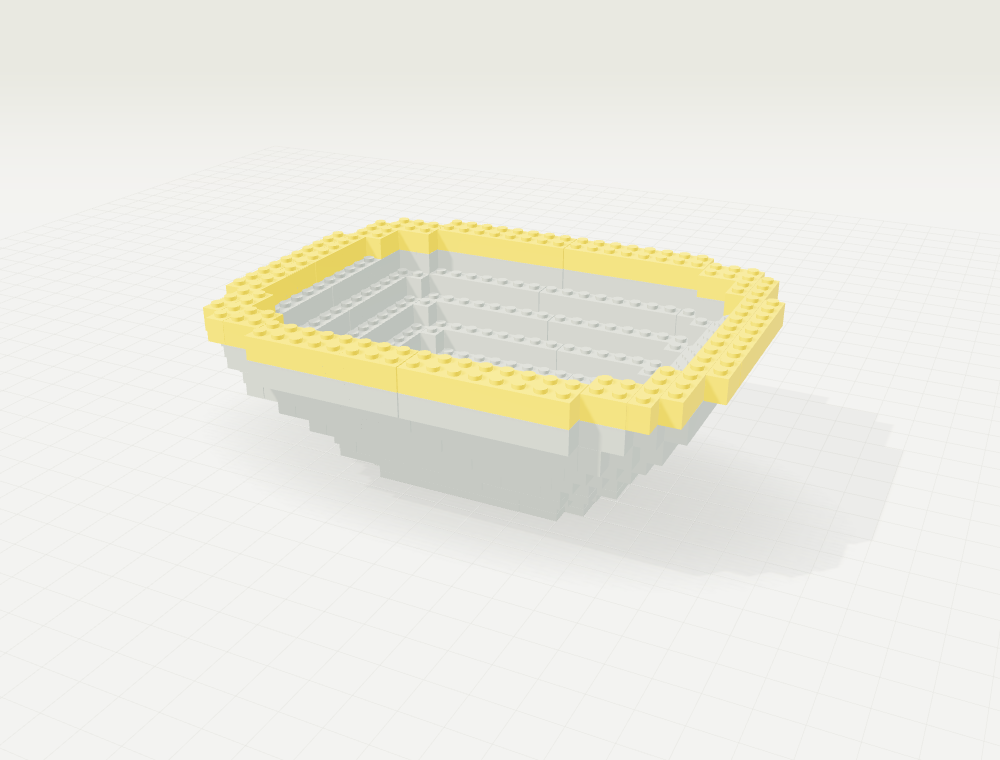
| Part | Description | Color | Qty |
|---|---|---|---|
| 3008 | Brick 1 x 8 | Yellow | 6 |
| 3004 | Brick 1 x 2 | Yellow | 4 |
| 3007 | Brick 2 x 8 | Yellow | 4 |
| 3002 | Brick 2 x 3 | Yellow | 2 |
| 3003 | Brick 2 x 2 | Yellow | 2 |
| 3010 | Brick 1 x 4 | Yellow | 2 |
Shape the bowl · layer 7
Continue the hollow shell, keeping the wide front face clear for the smile.
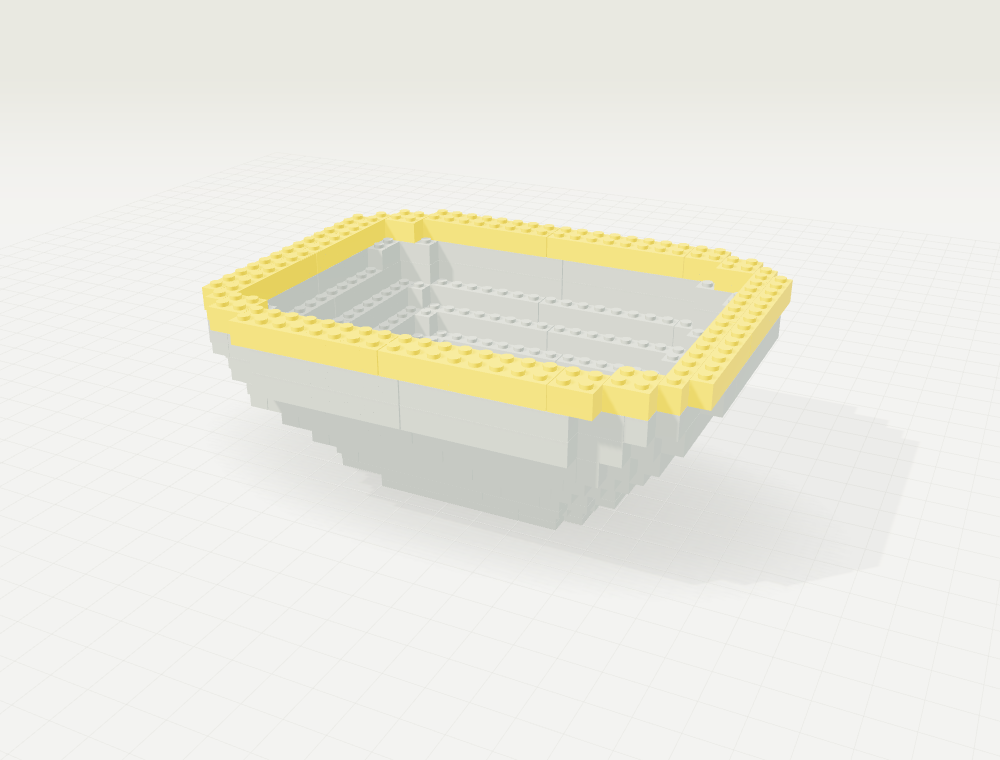
| Part | Description | Color | Qty |
|---|---|---|---|
| 3003 | Brick 2 x 2 | Yellow | 6 |
| 3008 | Brick 1 x 8 | Yellow | 6 |
| 3007 | Brick 2 x 8 | Yellow | 4 |
| 3009 | Brick 1 x 6 | Yellow | 2 |
Shape the bowl · layer 8
Continue the hollow shell, keeping the wide front face clear for the smile.
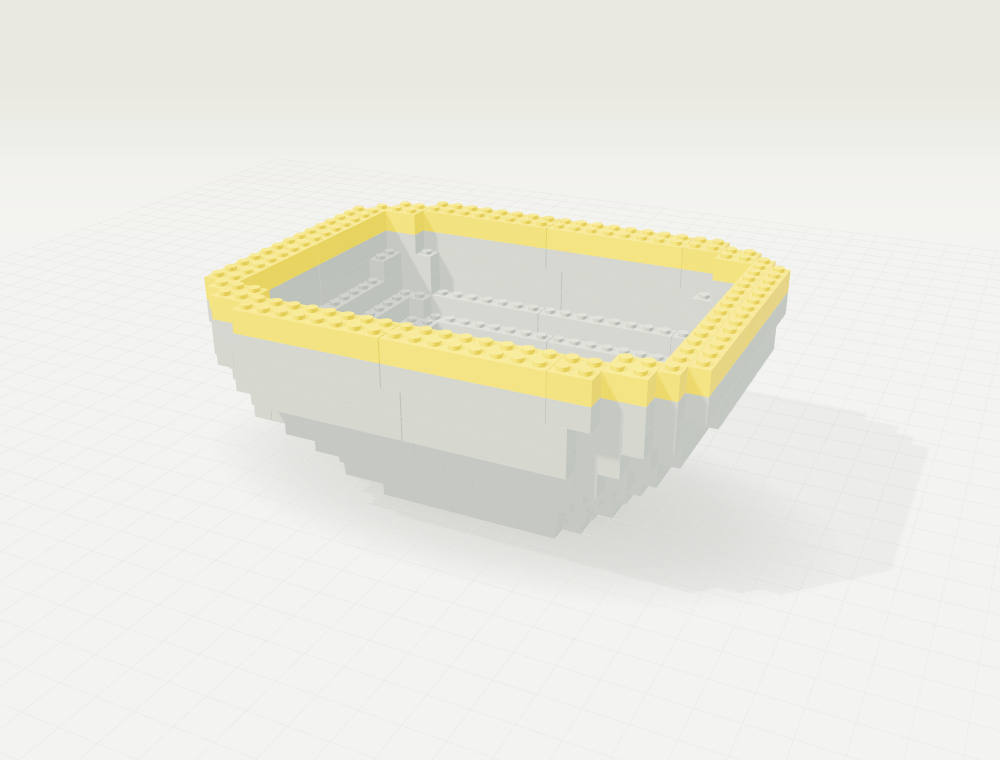
| Part | Description | Color | Qty |
|---|---|---|---|
| 3003 | Brick 2 x 2 | Yellow | 6 |
| 3008 | Brick 1 x 8 | Yellow | 6 |
| 3007 | Brick 2 x 8 | Yellow | 4 |
| 3009 | Brick 1 x 6 | Yellow | 2 |
Shape the bowl · layer 9
Continue the hollow shell, keeping the wide front face clear for the smile.
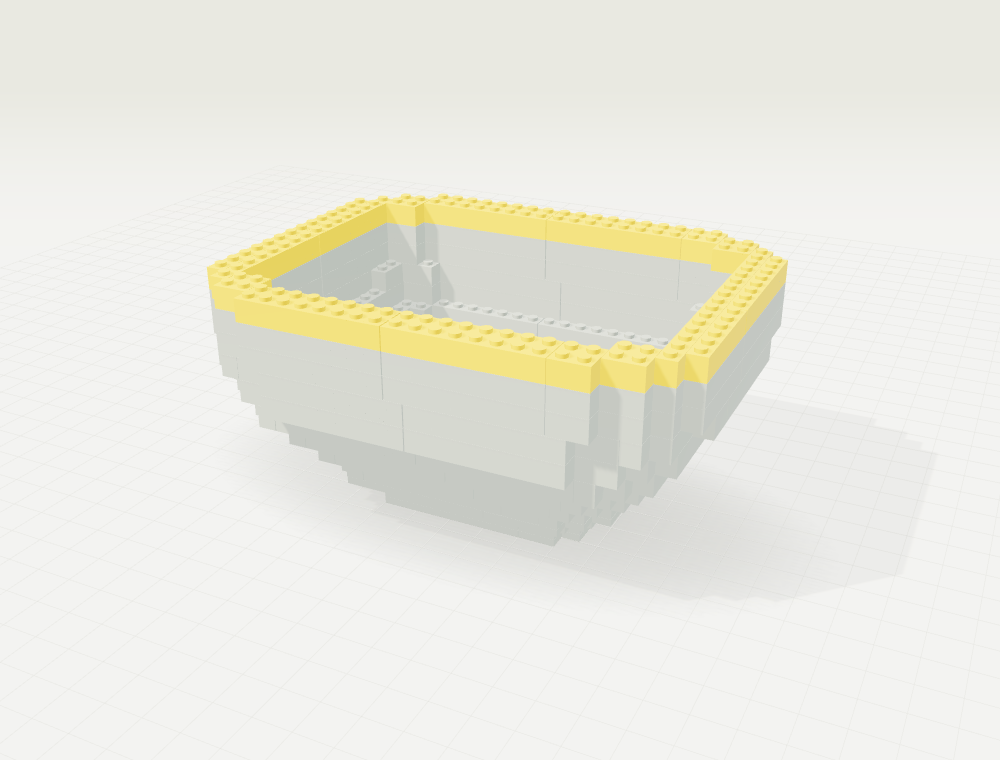
| Part | Description | Color | Qty |
|---|---|---|---|
| 3003 | Brick 2 x 2 | Yellow | 6 |
| 3008 | Brick 1 x 8 | Yellow | 6 |
| 3007 | Brick 2 x 8 | Yellow | 4 |
| 3009 | Brick 1 x 6 | Yellow | 2 |
Shape the bowl · layer 10
Continue the hollow shell, keeping the wide front face clear for the smile.
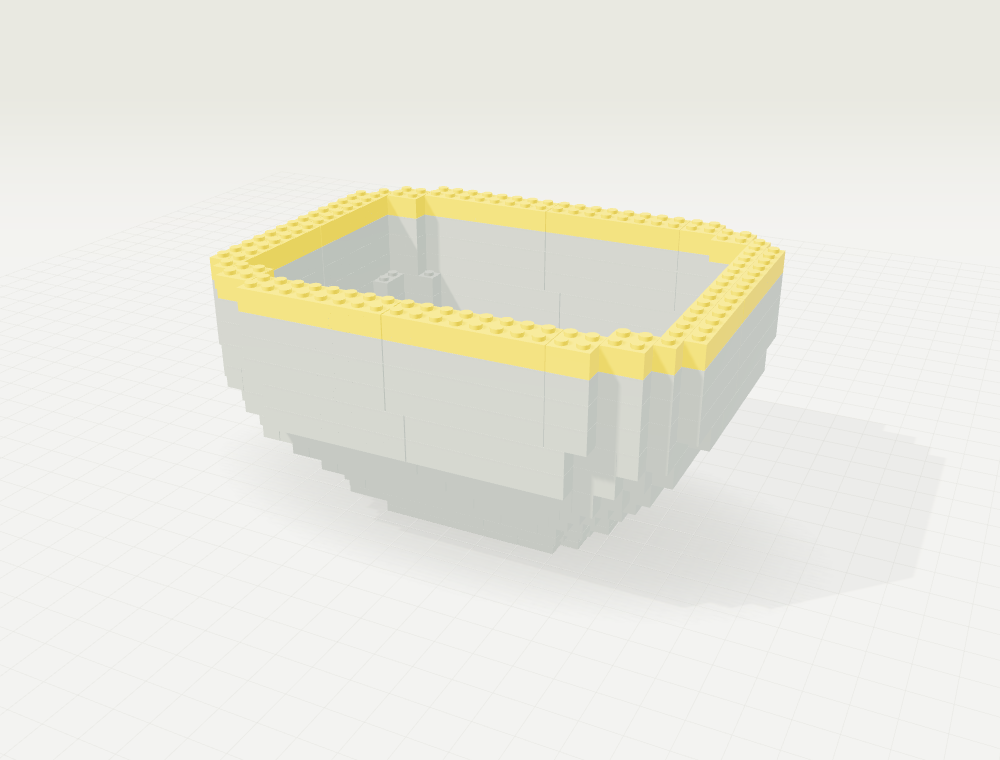
| Part | Description | Color | Qty |
|---|---|---|---|
| 3003 | Brick 2 x 2 | Yellow | 6 |
| 3008 | Brick 1 x 8 | Yellow | 6 |
| 3007 | Brick 2 x 8 | Yellow | 4 |
| 3009 | Brick 1 x 6 | Yellow | 2 |
Finish the upper wall
Continue the hollow shell, keeping the wide front face clear for the smile.
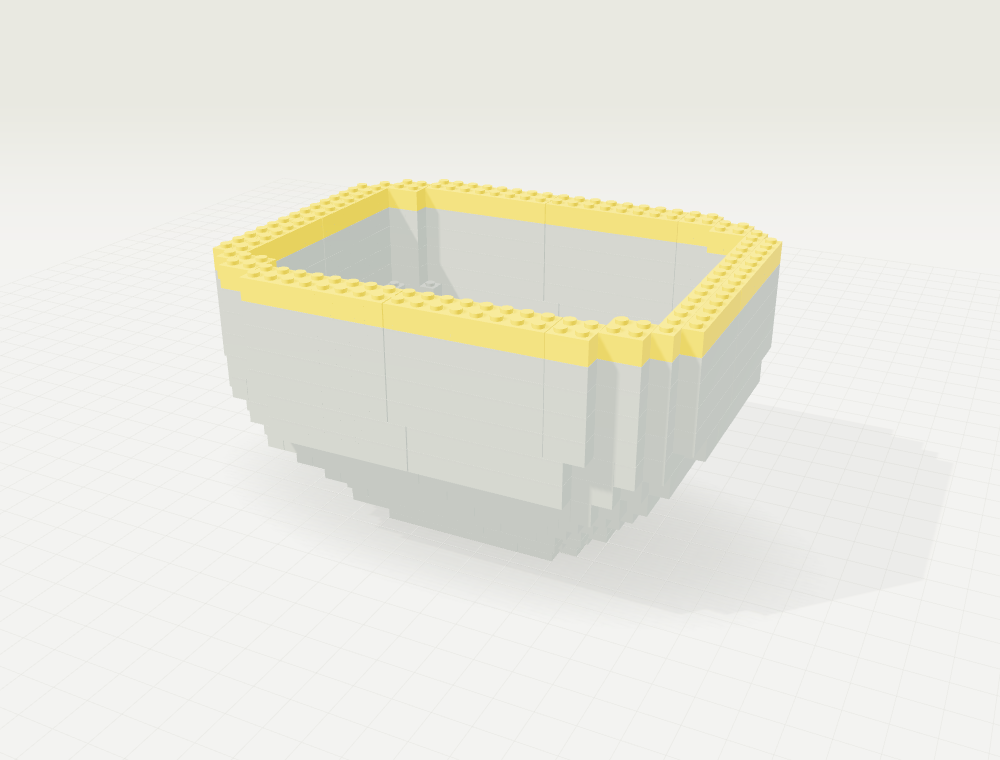
| Part | Description | Color | Qty |
|---|---|---|---|
| 3003 | Brick 2 x 2 | Yellow | 6 |
| 3008 | Brick 1 x 8 | Yellow | 6 |
| 3007 | Brick 2 x 8 | Yellow | 4 |
| 3009 | Brick 1 x 6 | Yellow | 2 |
Cap the rim
Add a black plate rim around the open top. Its outline separates the bowl from the spaghetti.
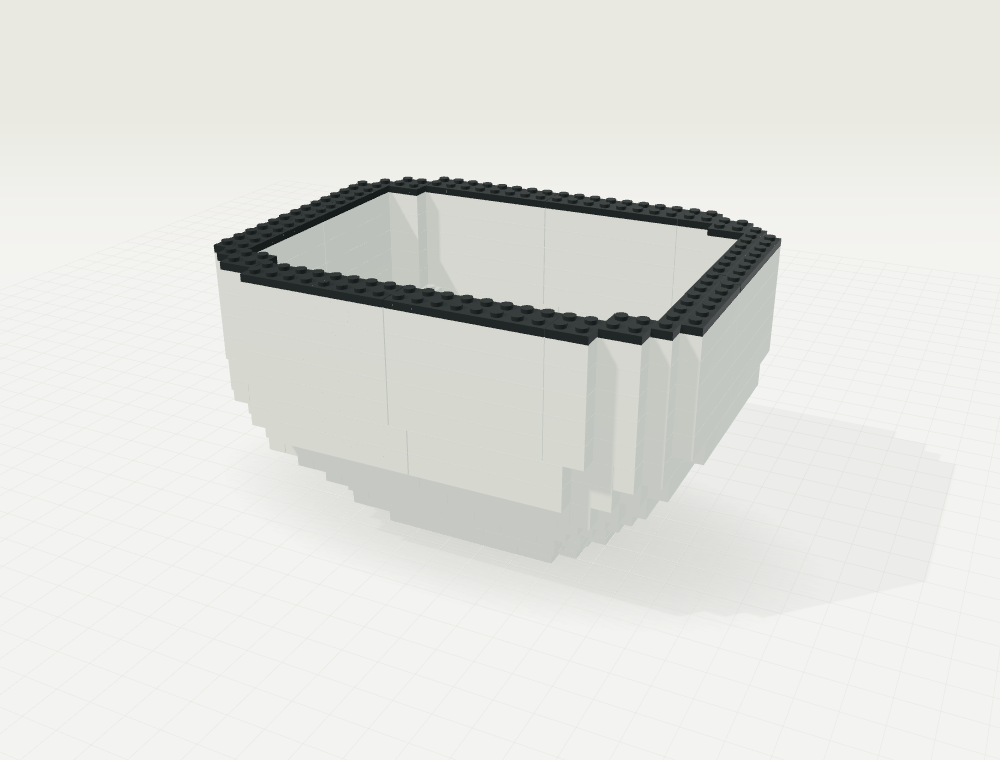
| Part | Description | Color | Qty |
|---|---|---|---|
| 3022 | Plate 2 x 2 | Black | 6 |
| 3460 | Plate 1 x 8 | Black | 6 |
| 3034 | Plate 2 x 8 | Black | 4 |
| 3666 | Plate 1 x 6 | Black | 2 |
Add the inner ledge
Build the ledge that carries the removable topping layer.
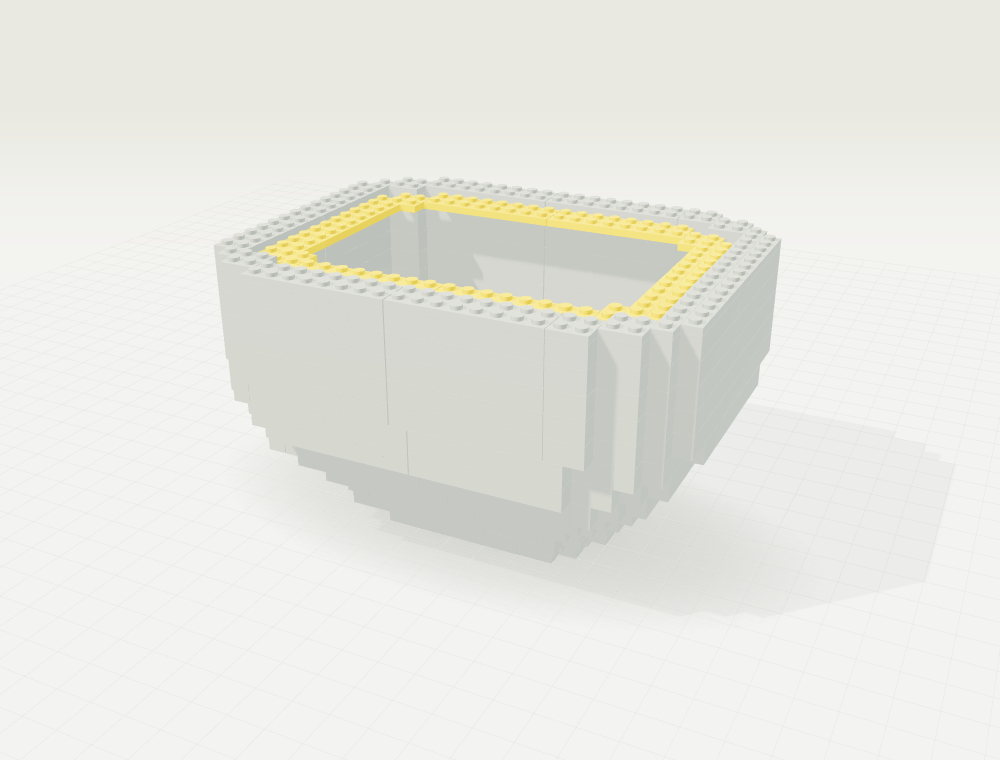
| Part | Description | Color | Qty |
|---|---|---|---|
| 3034 | Plate 2 x 8 | Yellow | 4 |
| 3460 | Plate 1 x 8 | Yellow | 4 |
| 3710 | Plate 1 x 4 | Yellow | 4 |
| 3022 | Plate 2 x 2 | Yellow | 2 |
| 3023b | Plate 1 x 2 | Yellow | 2 |
Two bright eyes
Fit two black round tiles to the face. These small circles give the mascot its friendly expression.
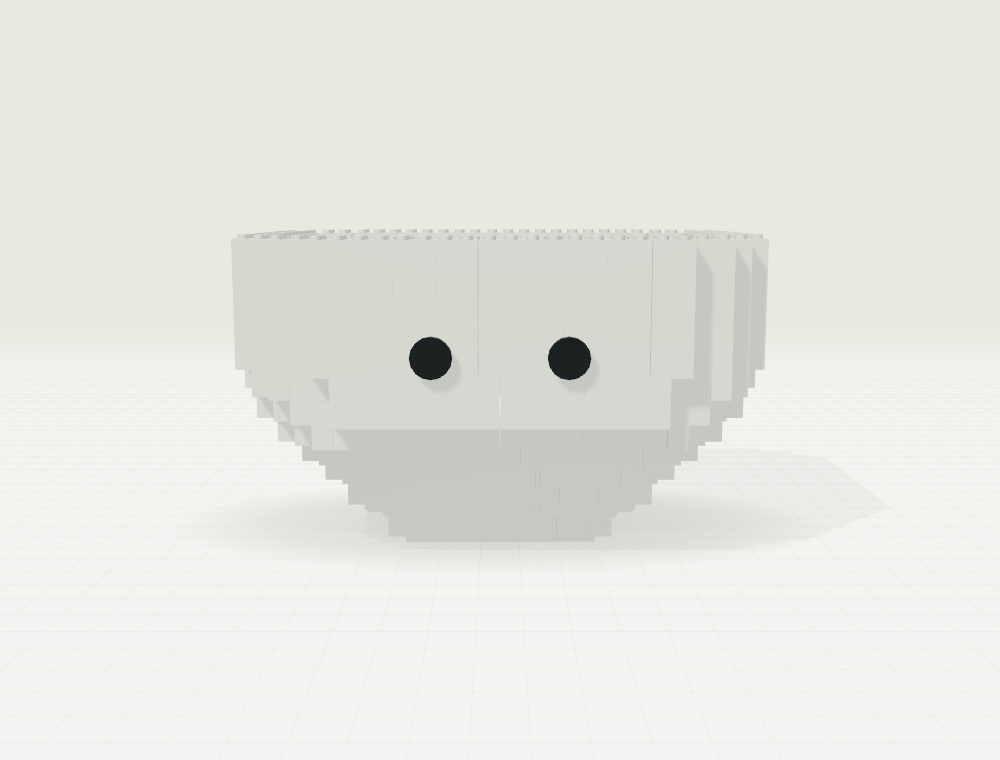
| Part | Description | Color | Qty |
|---|---|---|---|
| 4150 | Tile 2 x 2 Round with Cross Underside Stud | Black | 2 |
A spark of personality
Add a white highlight to each eye. These layered face details are conceptual placements; their attachment needs a physical-build review.
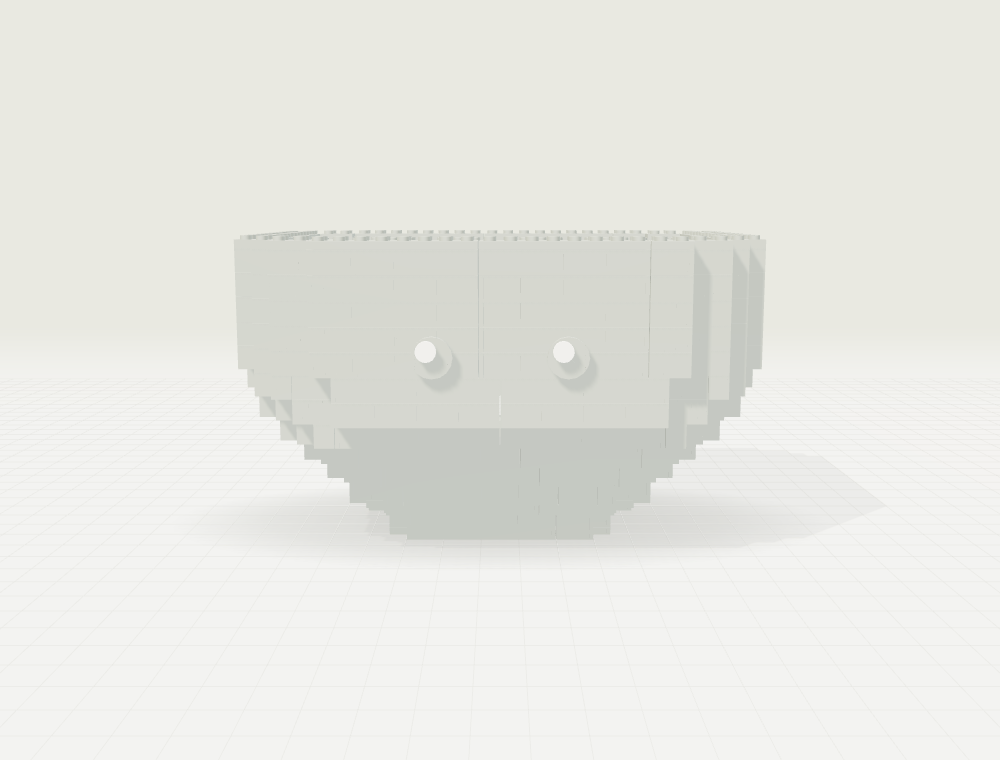
| Part | Description | Color | Qty |
|---|---|---|---|
| 98138 | Tile 1 x 1 Round with Groove | White | 2 |
Raise those eyebrows
Place short, gently arched eyebrows above the eyes.
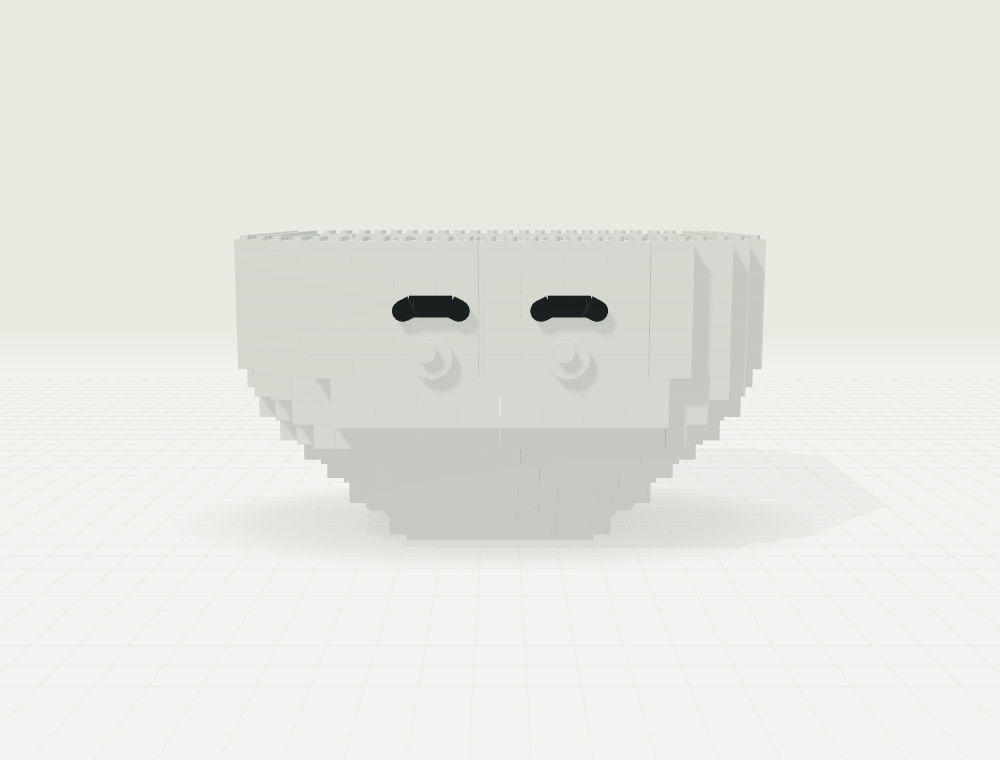
| Part | Description | Color | Qty |
|---|---|---|---|
| 24246 | Tile 1 x 1 with Rounded End | Black | 4 |
| 3069b | Tile 1 x 2 with Groove | Black | 2 |
Make room for a smile
Build the curved smile from small black tiles. The corners lift just a little.
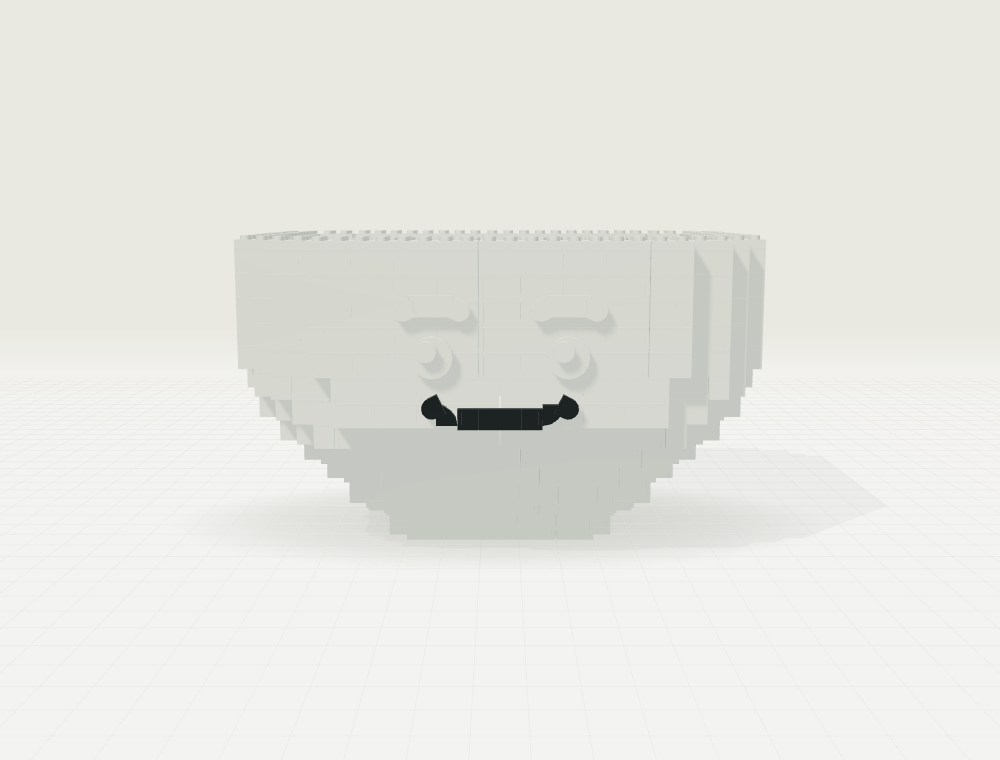
| Part | Description | Color | Qty |
|---|---|---|---|
| 3070b | Tile 1 x 1 with Groove | Black | 4 |
| 24246 | Tile 1 x 1 with Rounded End | Black | 2 |
| 25269 | Tile 1 x 1 Corner Round | Black | 2 |
Prepare the topping tray
Cover the inner ledge with a removable layer of plates, ready for sauce and spaghetti.
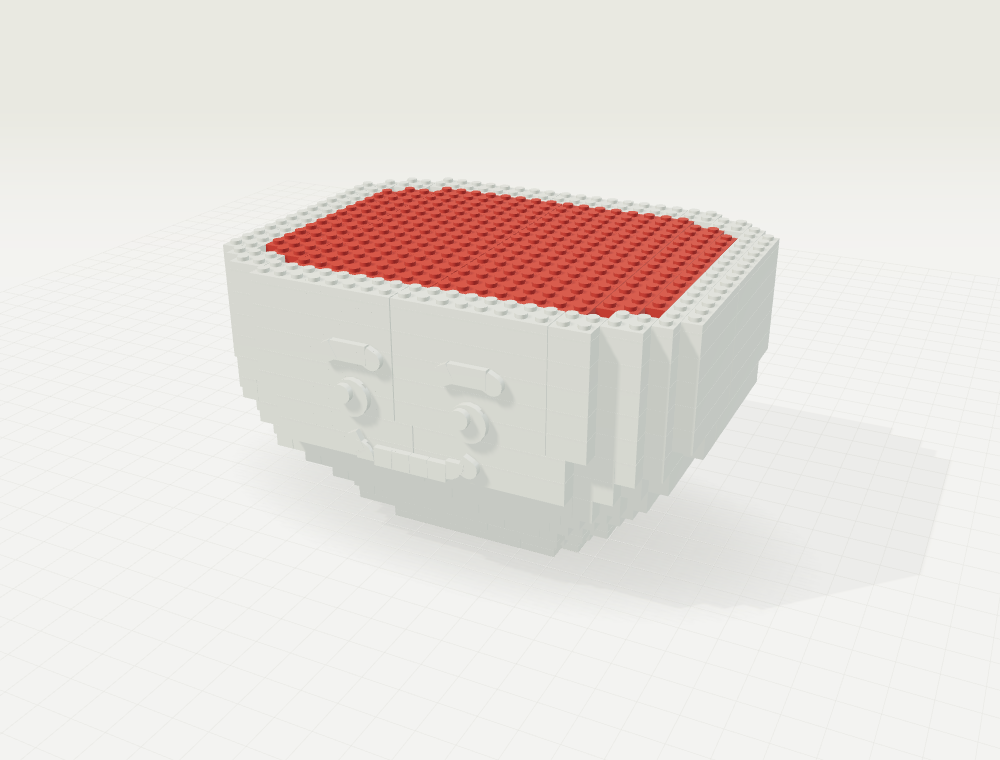
| Part | Description | Color | Qty |
|---|---|---|---|
| 3035 | Plate 4 x 8 | Dark red | 8 |
| 3034 | Plate 2 x 8 | Dark red | 2 |
| 3460 | Plate 1 x 8 | Dark red | 2 |
| 3710 | Plate 1 x 4 | Dark red | 2 |
| 3795 | Plate 2 x 6 | Dark red | 2 |
Spoon on the red sauce
Add a bright red surface, leaving its little studs visible between the noodles.
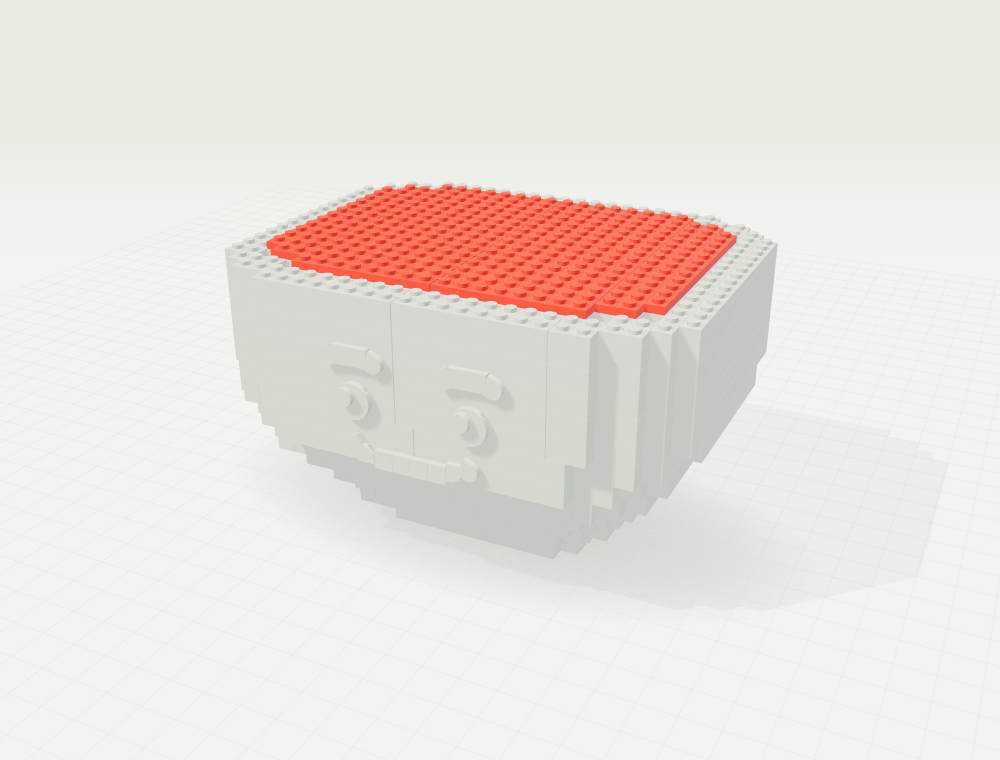
| Part | Description | Color | Qty |
|---|---|---|---|
| 3035 | Plate 4 x 8 | Red | 8 |
| 3034 | Plate 2 x 8 | Red | 2 |
| 3460 | Plate 1 x 8 | Red | 2 |
| 3710 | Plate 1 x 4 | Red | 2 |
| 3795 | Plate 2 x 6 | Red | 2 |
A little extra sauce
Add small raised islands of red and dark-red sauce beneath the spaghetti.
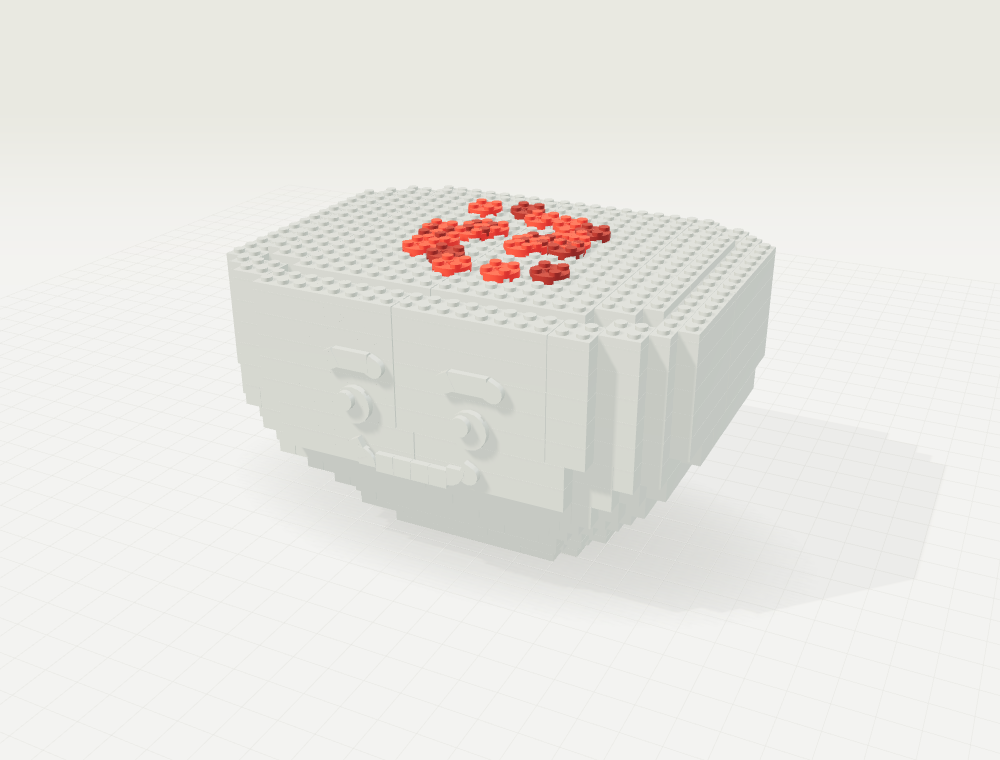
| Part | Description | Color | Qty |
|---|---|---|---|
| 4032a | Plate 2 x 2 Round with Axlehole | Red | 14 |
| 4032a | Plate 2 x 2 Round with Axlehole | Dark red | 8 |
Three little meatballs
Make each rounded meatball from four dome quarters. Three brown domes peek out of the spaghetti.
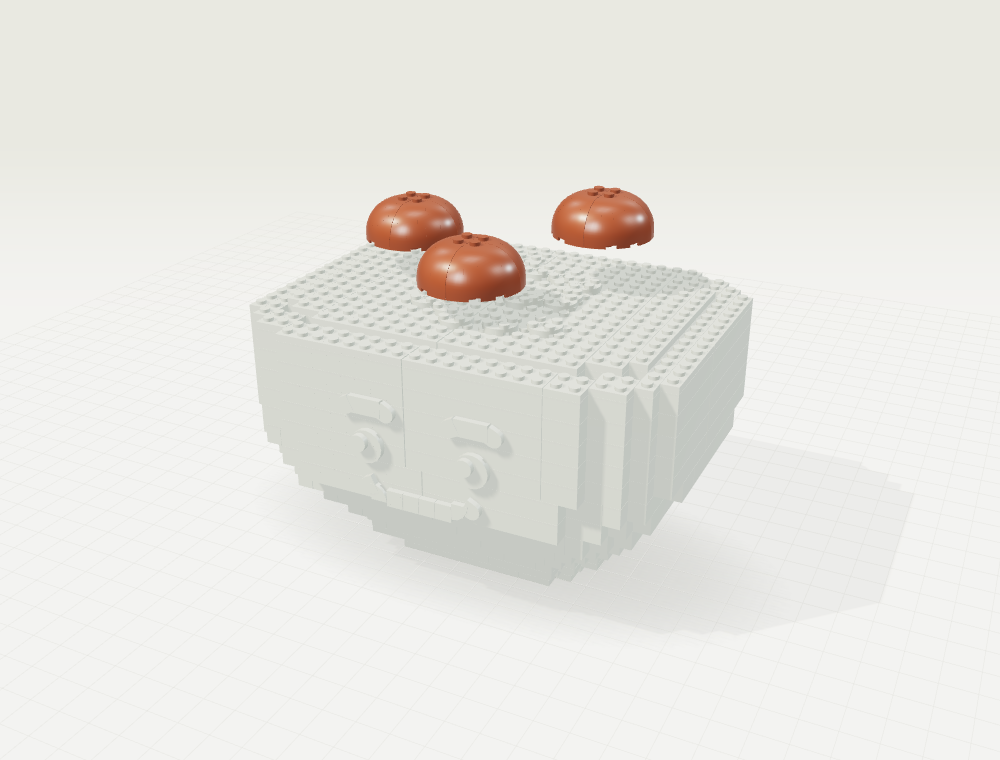
| Part | Description | Color | Qty |
|---|---|---|---|
| 88293 | Brick 3 x 3 x 2 Round Corner with Dome Top | Reddish brown | 12 |
The first forkful
Lay the first flexible yellow strands across the sauce. The shaped axles are counted as whole pieces.
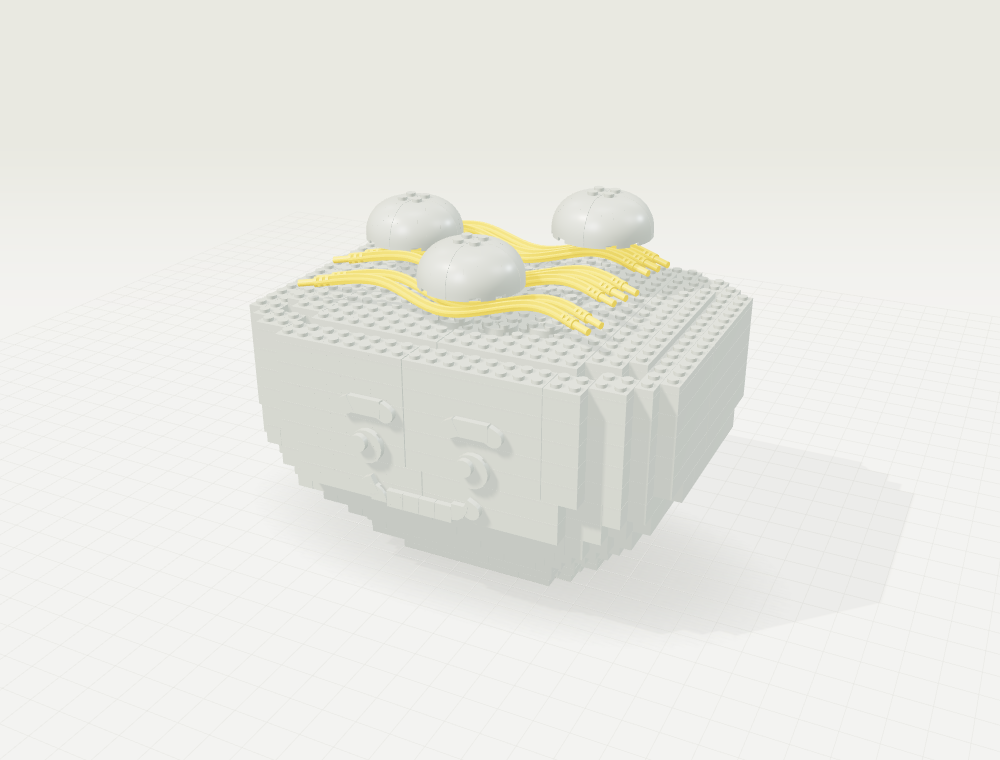
| Part | Description | Color | Qty |
|---|---|---|---|
| 32235 | Technic Axle Flexible 19 | Yellow | 8 |
Twirl across the top
Cross the first layer with soft, looping strands to create a generous tangle.
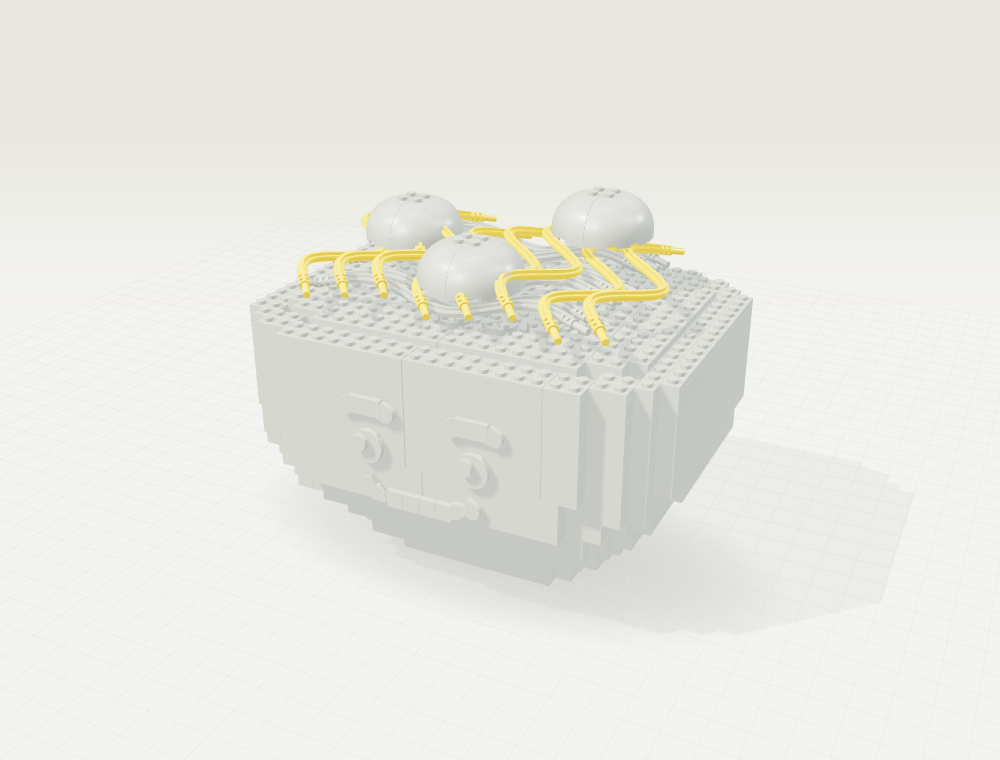
| Part | Description | Color | Qty |
|---|---|---|---|
| 32235 | Technic Axle Flexible 19 | Yellow | 8 |
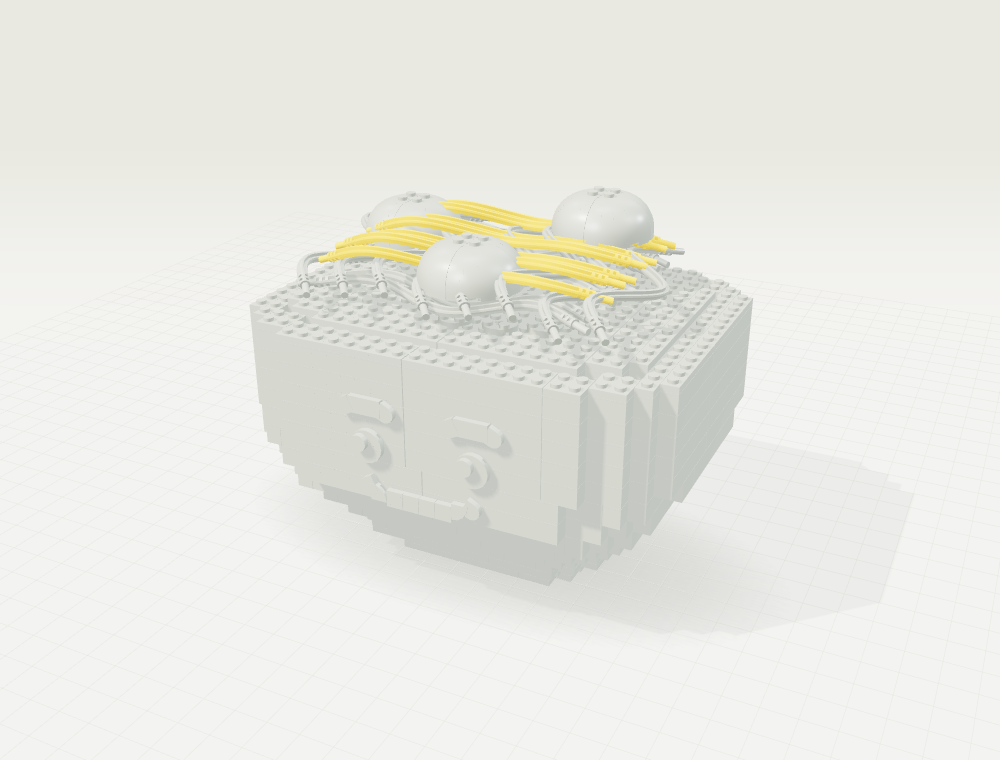
One more happy tangle
Add the topmost loops around the three meatballs.
| Part | Description | Color | Qty |
|---|---|---|---|
| 32235 | Technic Axle Flexible 19 | Yellow | 7 |
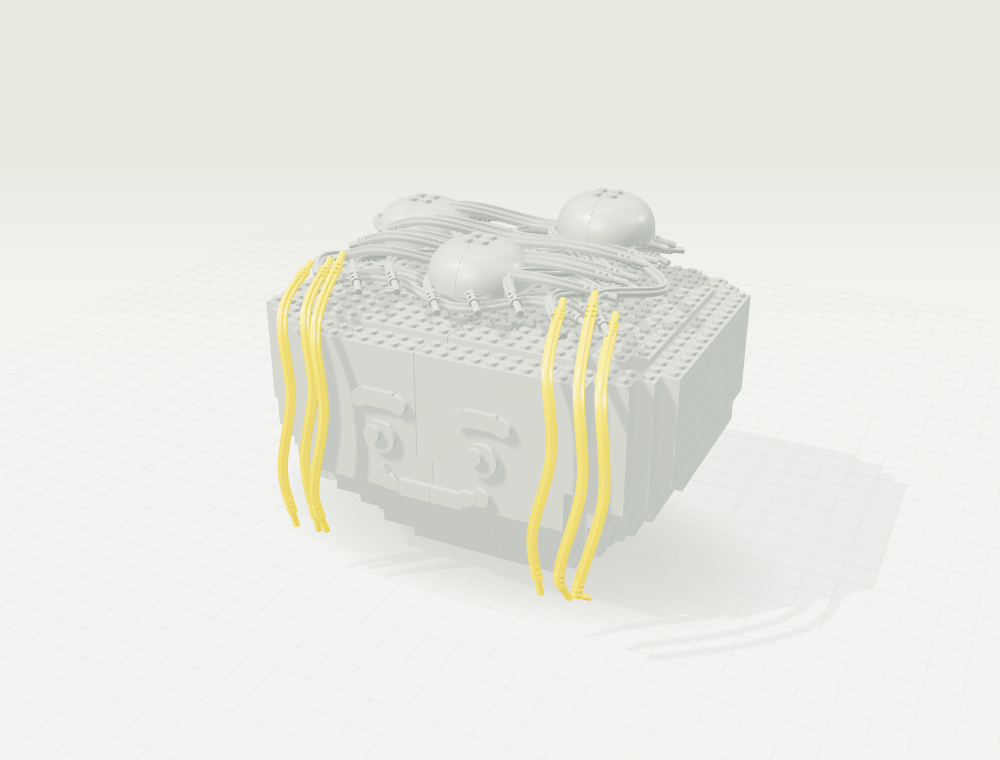
Let the noodles drape
Drape long strands over the left and right of the bowl. Keep the eyes and smile in the clear.
| Part | Description | Color | Qty |
|---|---|---|---|
| 32235 | Technic Axle Flexible 19 | Yellow | 6 |
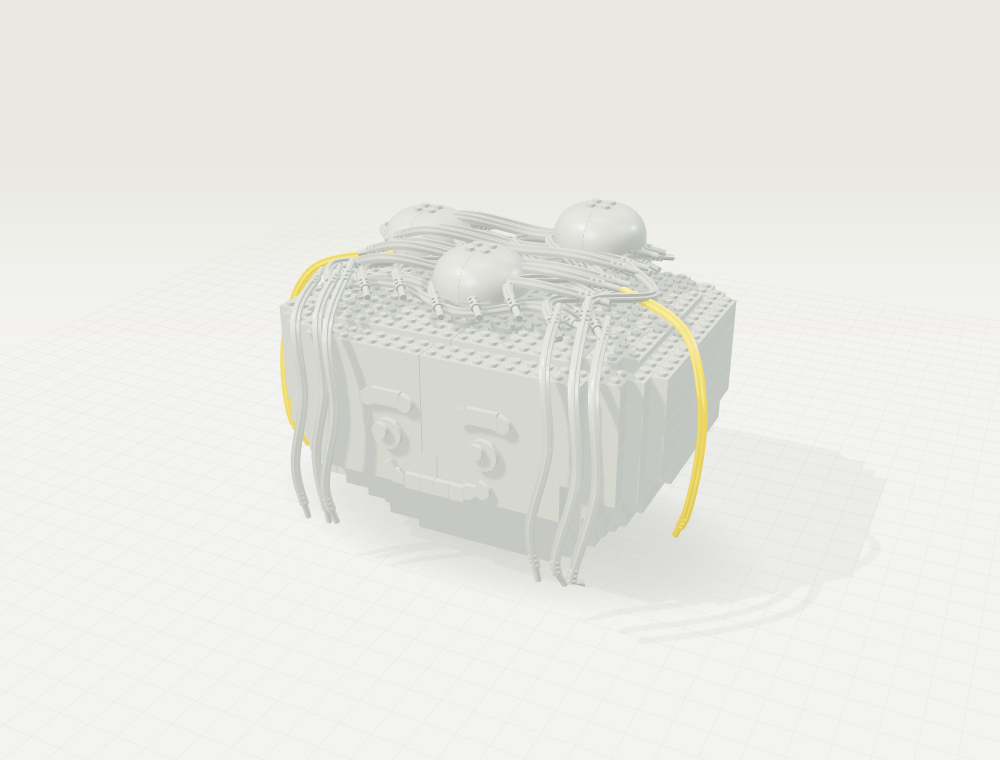
The last little noodle
Finish with two side strands. The spaghetti friend from socks.png is ready to explore.
| Part | Description | Color | Qty |
|---|---|---|---|
| 32235 | Technic Axle Flexible 19 | Yellow | 2 |
Every little piece.
375 pieces across 42 part/color combinations. Quantities match the interactive model and downloadable CSV. Curved noodles are counted as whole flexible axles.
| Part | Description | Color | Qty |
|---|---|---|---|
| 3008 | Brick 1 x 8 | Yellow | 60 |
| 3007 | Brick 2 x 8 | Yellow | 44 |
| 3003 | Brick 2 x 2 | Yellow | 40 |
| 32235 | Technic Axle Flexible 19 | Yellow | 31 |
| 3009 | Brick 1 x 6 | Yellow | 18 |
| 3005 | Brick 1 x 1 | Yellow | 16 |
| 4032a | Plate 2 x 2 Round with Axlehole | Red | 14 |
| 3004 | Brick 1 x 2 | Yellow | 12 |
| 3460 | Plate 1 x 8 | Black | 12 |
| 88293 | Brick 3 x 3 x 2 Round Corner with Dome Top | Reddish brown | 12 |
| 3035 | Plate 4 x 8 | Black | 9 |
| 3035 | Plate 4 x 8 | Dark red | 8 |
| 3035 | Plate 4 x 8 | Red | 8 |
| 4032a | Plate 2 x 2 Round with Axlehole | Dark red | 8 |
| 24246 | Tile 1 x 1 with Rounded End | Black | 6 |
| 3010 | Brick 1 x 4 | Yellow | 6 |
| 3022 | Plate 2 x 2 | Black | 6 |
| 3034 | Plate 2 x 8 | Black | 6 |
| 3034 | Plate 2 x 8 | Yellow | 4 |
| 3070b | Tile 1 x 1 with Groove | Black | 4 |
| 3460 | Plate 1 x 8 | Yellow | 4 |
| 3666 | Plate 1 x 6 | Black | 4 |
| 3710 | Plate 1 x 4 | Yellow | 4 |
| 3020 | Plate 2 x 4 | Black | 3 |
| 2456 | Brick 2 x 6 | Yellow | 2 |
| 25269 | Tile 1 x 1 Corner Round | Black | 2 |
| 3001 | Brick 2 x 4 | Yellow | 2 |
| 3002 | Brick 2 x 3 | Yellow | 2 |
| 3022 | Plate 2 x 2 | Yellow | 2 |
| 3023b | Plate 1 x 2 | Black | 2 |
| 3023b | Plate 1 x 2 | Yellow | 2 |
| 3034 | Plate 2 x 8 | Dark red | 2 |
| 3034 | Plate 2 x 8 | Red | 2 |
| 3069b | Tile 1 x 2 with Groove | Black | 2 |
| 3460 | Plate 1 x 8 | Dark red | 2 |
| 3460 | Plate 1 x 8 | Red | 2 |
| 3710 | Plate 1 x 4 | Dark red | 2 |
| 3710 | Plate 1 x 4 | Red | 2 |
| 3795 | Plate 2 x 6 | Dark red | 2 |
| 3795 | Plate 2 x 6 | Red | 2 |
| 4150 | Tile 2 x 2 Round with Cross Underside Stud | Black | 2 |
| 98138 | Tile 1 x 1 Round with Groove | White | 2 |
Geometry from the LDraw Parts Library, licensed CC BY 4.0. Original author credits are preserved in the MPD and the credits file. LEGO® is a trademark of the LEGO Group. This independent project is not affiliated with LEGO.